Showing posts with label Visual basic. Show all posts

Saturday, February 15, 2020

Creating a DataGrid View and a Details View on a Windows Application form using Visual Basic, Visual Studio 2019 and an Access Database

This project was created using Visual Basic with Visual Studio as the IDE.  The objective was to grab data from a Microsoft Access database  and add that on to a Visual Basic Windows application form in two formats: as a DataGridView and as a Details View.

The project outline is as follows:

  • A new project is created as a Windows application in Visual Basic using the Visual Studio 2019 IDE.
  • Click on View on the Visual Studio menu, select Other Windows and then Data Sources.
  • On the Data Source window, click Add new Data Source as the Data Source Configuration Wizard opens.
  • On the choose a Data Source Type, select Database and click next.
  • On the Choose a Database Model, select Dataset and next.
  • Select New Connection on the Choose Your Data Connection.  On the Add Connection form, navigate to the Microsof Database File for the data source.
  • In the Database File Name of the form, specify the path and name of the .mdb file you want to work with.  (In my case, I choose the xtreme.mdb database).
  • Click on the Test Connection; answer should be test connect successful.
  • Then click OK.
  • On the Choose Your data connection, select next.
  • Select next on the save Connection string to the application Configuration page.
  • Expand the tables in the database on the left and choose your database objects.
  • Select the table you wish to work with in your dataset and select Finish.
The dataset is now added to your project and the tables and views appear in the DataSources window..  You are now ready to move the data from the database and tables in DataSources on to the Windows Visual Basic form.

This can be done using a DataGrid View control by dragging the DataGrid View control on to the form.

  • Run the project.  The data in the table will then be loaded on to the DatagridView.
To view the table data in the Details format click and drag the Details view from the table on to the form

  • Run the project.  The result will show the details in a tabular format.
These two screenshots show first the DataGridView and second the Details View.


DataGrid View

Details View


Creating a DataGridView on a Webform using Visual Basic, Visual Studio 2019 and an Access Database


A. Creating the webform.

1. Start up Visual Studio 2019.
2. Select Continue without code.
3. On the page that opens up, click on File, New, Project.
4. Select ASP.NET Web Application (.NET Framework) in Visual Basic, Windows, Cloud, Web.
5. Click next.
6. Give the project a name (e.g.WebApplication) and a location.
7. Click Create.
8. Visual Studio will create the project and open up the Webform.  If the webform does not appear, click on Solution Explorer.
9. Right click on Default.aspx and select View Designer.  The webform will appear with ASP.NET at the top.
10. Place the cursor to the right of ASP.NET and press Enter about 4 times.
11. This will create 4 empty lines on the webform.
12. Switch to the Toolbox (View, Toolbox).
13. Scroll down to Data, select GridView and drag and drop it on the form.
14. Next to the GridView grid, a menu appears (GridView Tasks).
15. At Choose Data Source, click on the drop down arrow and select New Data Source.

B. Adding the Database

16. In the Data Source Configuration Wizard, select Database and click OK.  The SqlDataSource1 automatically shows up as Specify an ID for the data source.
17. Click OK.
18.  In the window that opens "Choose Your Data Connection", Select New Connection.
19. In the Add Connection form, the Data Source automatically registers as MicroSoft Access Database file (OLEDB).
20. Browse to the Access database file name you plan to use.
21.  Click on Test Connection; should say it was successful.
22. Click OK, next, next.
23.  In the form that opens up "Configure Data Source--SqlDataSource1.
24. Select "Specify columns from a table or view".
25. A click on the down arrow reveals that the xtreme database I am using has several tables.  I selected the Employee table.
26. Tick off the columns you plan to show in your webform.  I selected Employee ID, Last Name, First Name, Position, Home Phone.
27.  To the right of this form are 3 buttons.
28. Select the "Order by Button" and click on Last Name (I selected Last Name to sort in ascending order).
29.  Click next, and then Test Query on the next page.  Th result should show the data returned by this data source ordered by Last Name.
30. Click Finish.  This bring us back to the .NET webform with the gridview and GridView Tasks.

C. The GridView1 Properties.

31.  Notice that the SQLDataSource1 has been automatically added to the DataSource ID in the Properties window and that the EmployeeID has been added to DataKeyNames.
32.  Click on DataKeyNames and then on the ellipsis.
33.  This opens up two squares; one with the available data fields and the other "Selected data fields".
34. Move the datafields from the left to the right using the > arrow.
35. When done, click OK.

D. Run the project.

36.  Click on IIS Express on the Visual Studio Menu.
37. Let the project build and then open up in the web browser (Google Chrome in my case).
38.  The results should show the data in the GridView of the webform (will take some time to appear).

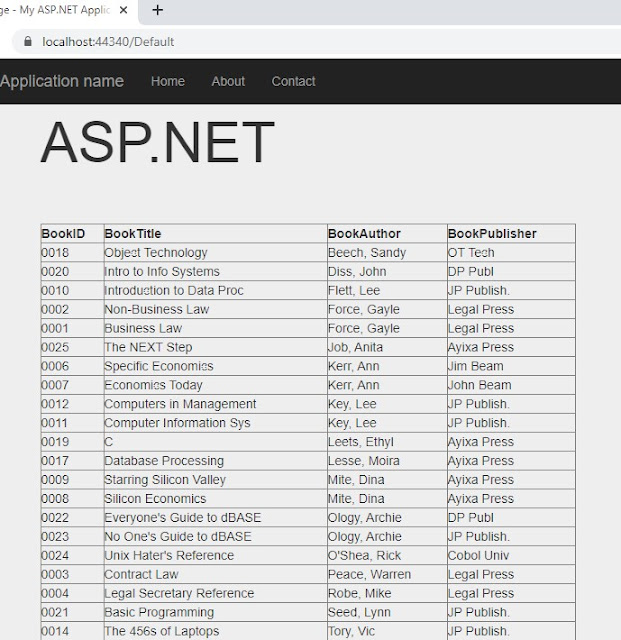
Below is the result of the data from the Book table of the Library.mdb Access database and the Employee table of the xtreme.mdb database using Visual Basic and Visual Studio 2019.

Grid View result of the Book table from the Library database


GridView result from the Employee table of the xtreme database.


.
19